
Sandra Carson offers a step by step guide to Sugarcane pose.

About the sequence
To work towards Sugarcane (Ardha Chandra Chapasana), you’ll need to prepare most areas of your body. This challenging pose requires strong and stable legs, open quadriceps, a good balance, open shoulders and a warmed-up spine! The pose itself is strong yet sweet; once you are able to hold your foot, the intensity of the effort decreases and your body will feel open, energised and graceful.
Please note: my descriptions mirror what you see in the images.
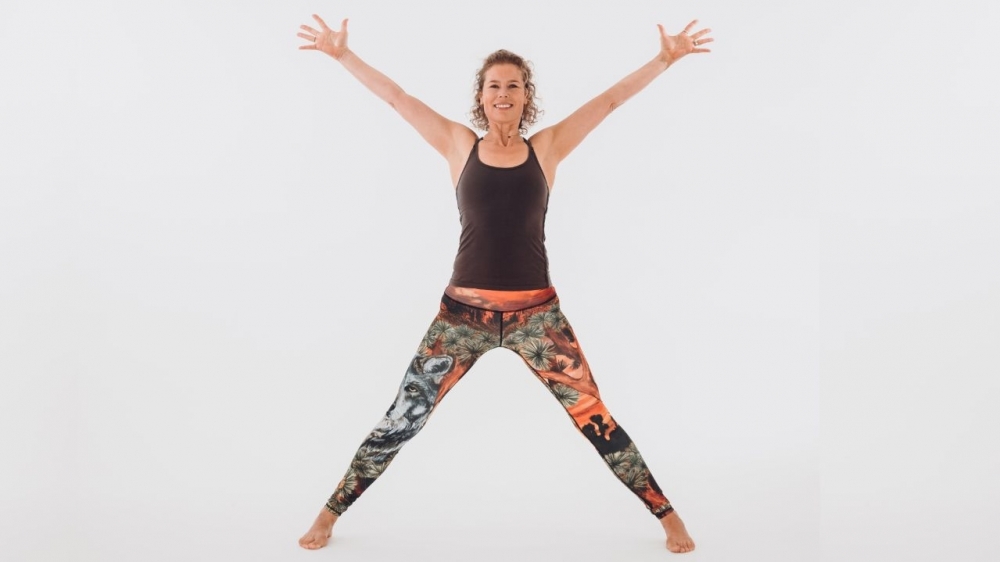
1. Star pose
This pose gives you the same expansive quality that Ardha Chandra Chapasana (Sugarcane pose) has. Your feet are firmly rooted into the mat, anchoring you down. Your spine is extended and long with the crown of your head reaching to the sky. Your arms are spread out and your chest is open and expanded. From your pelvis, your energy can radiate out in all directions!
From Tadasana, step your feet wide apart. Take your arms out in line with your shoulders. Draw a straight line down from your wrists and position your ankles in line with your wrists. Inhale and make your legs strong, hug your muscles to the bones and press into the outer heels and balls of the big toes. Take a moment to feel your grounding and strength. Inhale and take your arms above your shoulders into a star shape. Spread your fingers and draw the energy into your shoulders from your fingers. Exhale and from your pelvis, stretch out in all directions: from your feet grounding into the floor, and your fingertips stretching up to the sky.
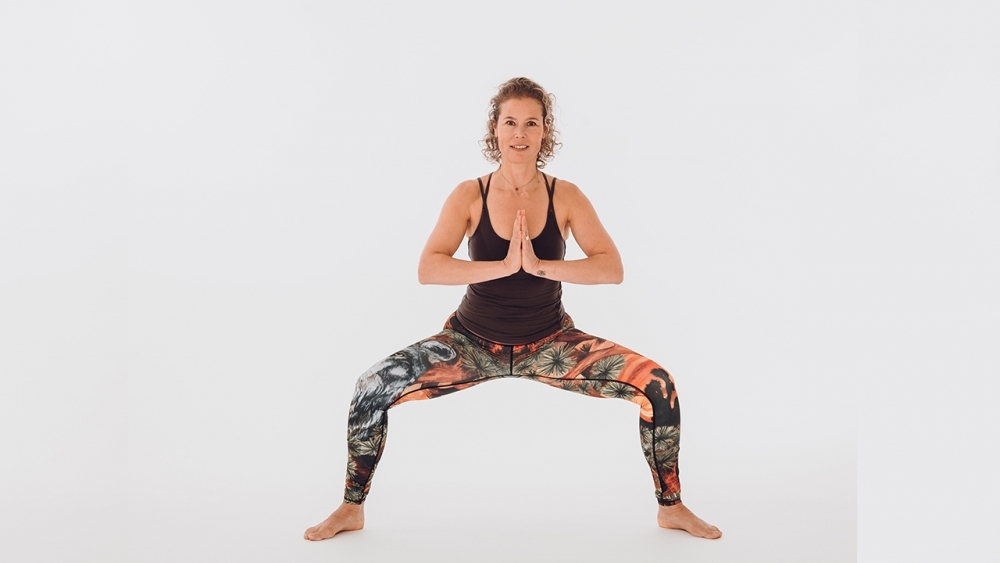
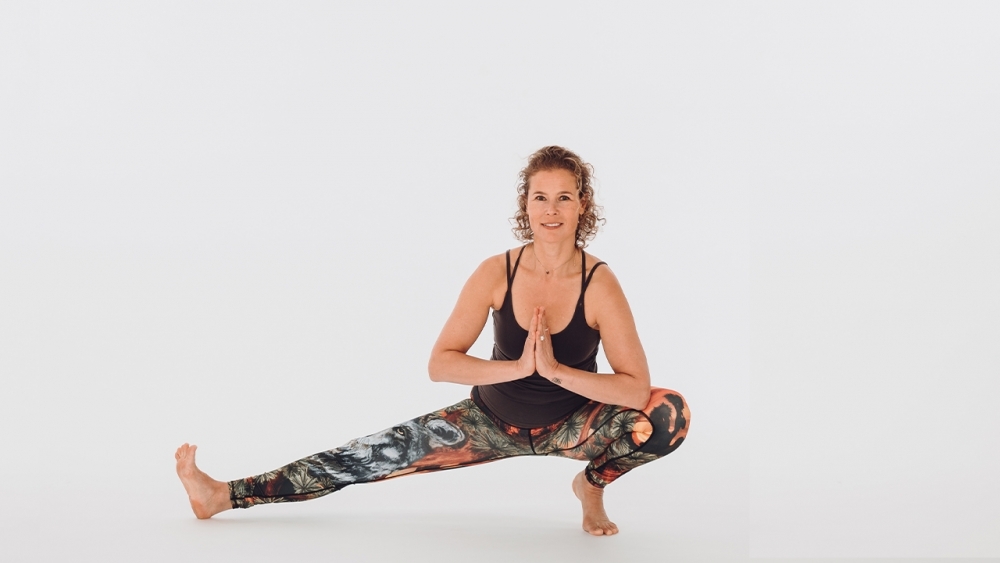
2. Goddess pose
This pose will get your leg muscles working and encourage grounding from your pelvis into your feet. This is important because the pelvis is the centre of Ardha Chandra Chapasana; from where all the energy moves out to the limbs and torso.
Keep your feet the same distance apart as in Star Pose (the closer your stance is, the more stable your posture) and turn your toes to roughly a 45-degree angle. Bend your knees, making sure they follow the direction of your toes, and bring your palms together at your chest. You may feel your pelvis tipping forward and your sitting bones spread apart. If the arch in your spine feels too strong, draw your belly in and up (as if you were zipping up your jeans) and energetically press from your belly into your heels.
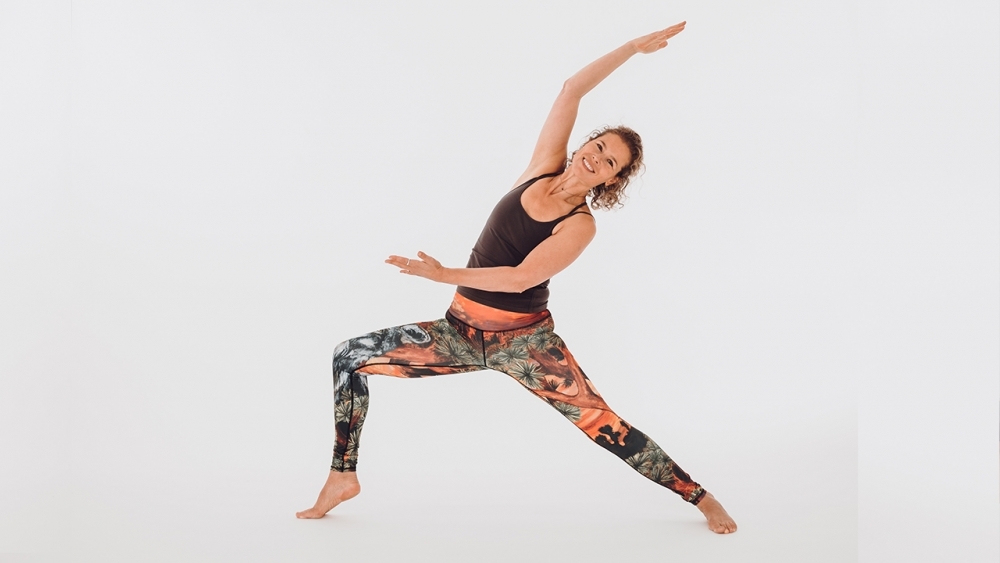
3. Reverse Warrior II on tiptoes
This pose will strengthen your legs, abdominal core and open your groin and inner thighs. It also creates strength and gracefulness and gives you a sense of alertness and lightness.
Take your feet a little wider apart and turn your left leg out. Bend the left knee deeply, bringing it to roughly 90 degrees if you can. Otherwise, keep your knee behind your ankle. Exhale and ground deeply through your feet, heels and the big toe mounts. As you inhale, engage your leg muscles and press out through the right outer foot. Keeping the back foot as an anchor, lift your left/front heel slowly off the mat. The higher you lift, the less stable you become. Keeping your left heel lifted, sink a little deeper into your left hip joint/groin. Press your left big toe mound deeply into the mat, gently move your left knee towards your left little toe side (this will open the left inner thigh even more). Keep the grounding, strength and lift in the legs, and raise your arms in line with the shoulders, as in ‘regular’ Virabhadrasana II. Then swing your right arm forward and left arm back (this will engage your abdominal muscles). Then move the left arm forward and right arm overhead. Switch sides after a few movements.
4. Wide legged forward fold
Paravritta Padottonasana pose stretches the inner thighs and hamstrings. It also stretches the shoulders and chest muscles which need to be open to enable you to hold onto your foot in the peak pose.
From Virabhadrasana II, turn your toes in so that all ten toes point forwards. Take your hands behind your back and interlace your fingers. You may be able to press your palms together, you may not. Either way, inhale and try and pull the hands apart while keeping the fingers interlaced.This will engage the muscles of the shoulders. Keep that action and draw your shoulders back, as if you are doing a backbend. With the shoulders in this deep stretch, engage your leg muscles and bend forward at your hips. Keep your chest forward to help engage the back muscles. Again, if find you’re over-arching your spine, draw your belly in and up.

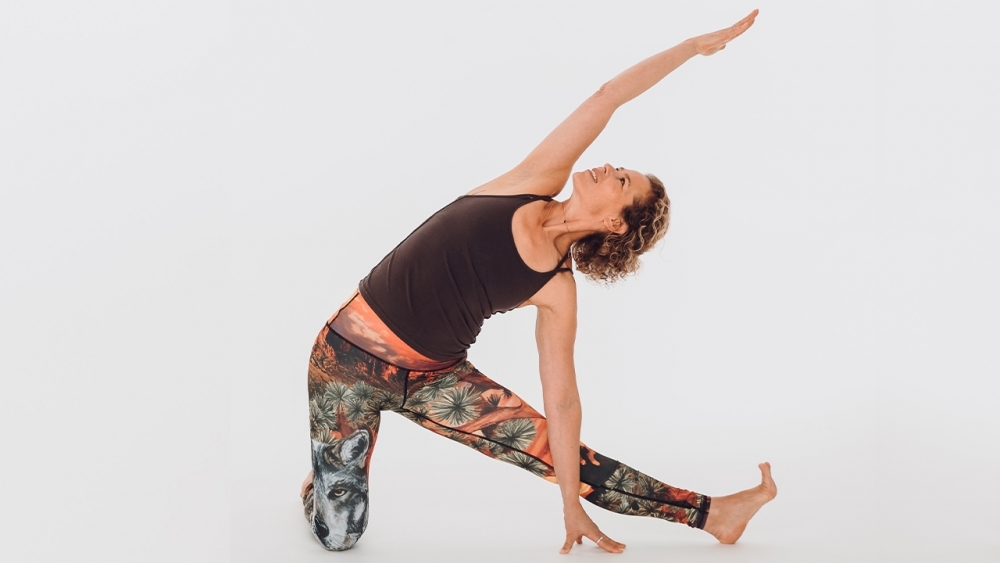
5. Gate pose
Gate pose or Parighasana is an intense inner thigh and side body opener, which, owing to the asymmetrical position and smaller foundation, prepares you for the balancing act to come.
Take a low lunge position, with your left leg back and your knee down on the mat. Rotate your knee on the floor and move your left foot back behind you (your shin will be perpendicular to your yoga mat). Keep your left hip in line with the left knee as you turn your right leg out at the hip joint. As your right toes turn upwards, keep a micro-bend in your right knee. This is important to prevent overstretching your knee joint.
Inhale and press your heel down. Check that your right foot is aligned with your hips and left knee. Place your right hand on your right leg or a block or on the floor, aiming to keep your upper body in line with your legs (as in Trikonasana/Triangle pose). Inhale and bring your left armup and overhead. Draw your belly in and up and gently draw your glutes (buttock muscles) downward, to create a lift in your lower torso. If you feel a bit wobbly, keep your gaze towards the floor.The upper arm in line with the ear gives the sides of your body an intense stretch, similar to Ardha Chandra Chapasana. Stay in the pose for a few breaths, then change sides.
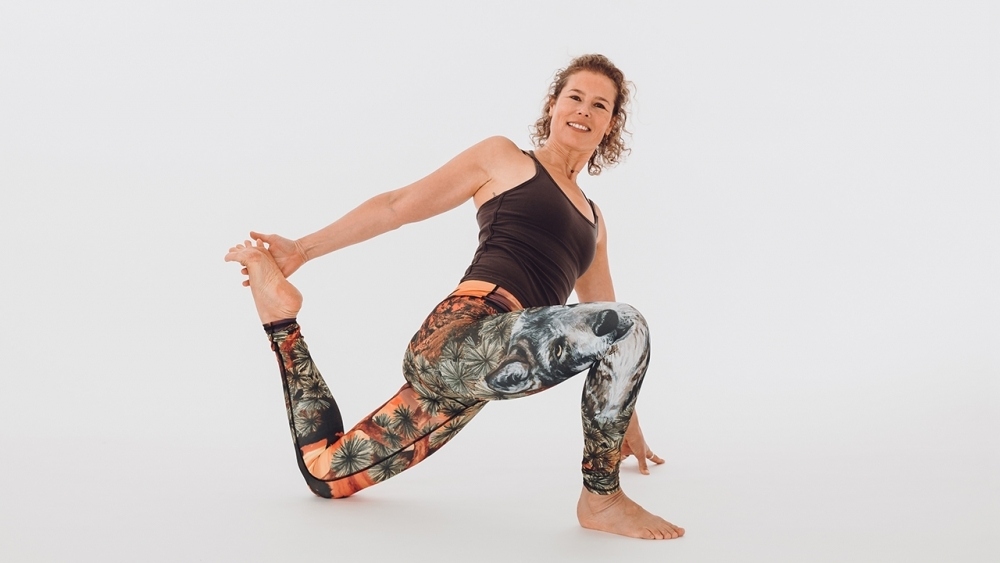
6. Monkey twist
This combination of a lunge and a twist, a backbend and a thigh stretcher, will enable you to engage and strengthen the major muscles that you will use in Ardha Chandra Chapasana. Monkey twist is a wonderful precursor to the peak pose; if you can hold your bent-legged foot, then Sugarcane will be a breeze ;). This pose encourages the opening of the groin and invites you to engage your abdominal core because the thigh stretch tends to tilt your pelvis. Holding your back foot is also a deep stretch for your shoulder and chest muscles.
Take your left leg back into a low lunge with the knee on the floor (you may want to place it on a blanket). Place your hands on the floor and bend deeper into your front/right knee to move beyond the kneecap of the right leg*. You may want to turn your right foot out a little but make sure your the knee is ‘tracking’ in the same direction as the toes. Bend the left knee and take your left hand to your left foot (or place a belt around it if you can’t reach it) and hold still for a moment. Breathe… Strongly pull your belly in and up and rotate your spine to the left. Extend from your pelvis out through your legs and spine. Gently draw the back foot in for a deeper stretch, pressing your foot into your hand strongly. Hold for a few breaths and then switch sides.
*This ensures you’re not leaning on the top of the kneecap when you bend the back leg.
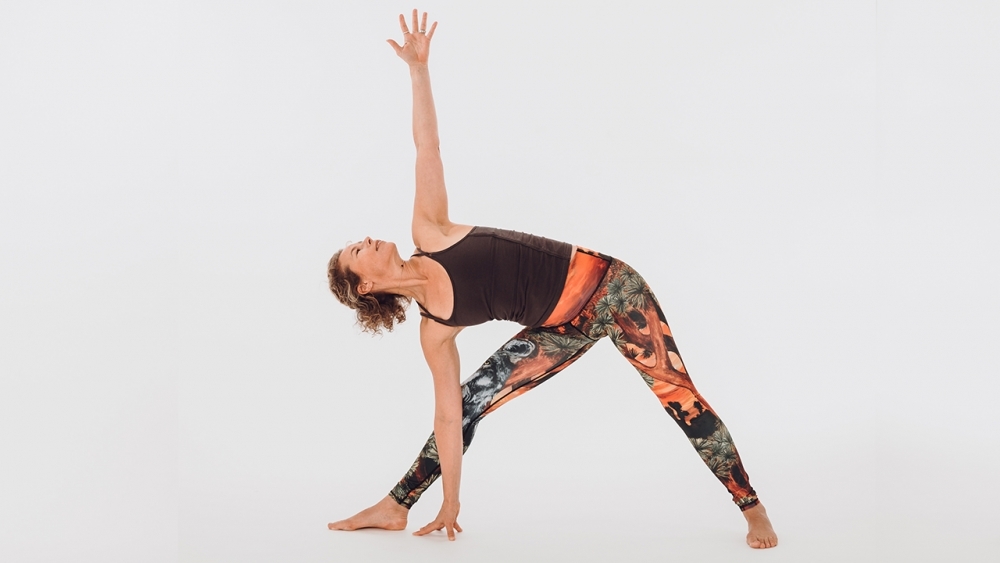
7. Triangle pose
Triangle pose (Trikonasana) is the ultimate preparatory pose for Sugarcane. It stretches both the inner thighs, hamstrings and upper body and opens the chest and shoulders. It also trains your deep neck muscles, as they need to work against gravity to hold your head up in mid-air. Your thigh muscles need to be long and strong to perform the pose well. From the pelvis there is a strong grounding through both legs and feet; this is needed to keep your balance in the peak pose.
Step your feet wide apart and turn your left leg out. The wider your feet, the more stretch you will have in the inner thighs and the more space you’ll feel in your pelvis. Take your left hand to the floor, a block or your leg. Keep your front knee a little bent and press your outer heels into your mat. From your pelvis, gently draw your belly in and up. From there, start twisting your spine up to the sky, from your belly to your chest. Once your upper body is rotated skyward, take your right arm up. Keep your right shoulder back and your right hand in line with your shoulder. Inhale and lengthen the bottom (left) side of your torso. From your belly, press your feet more strongly into the mat and stretch your upper body. If your neck feels strain or you’re unstable in your pose, take your gaze down to the floor. Take a few breaths and switch sides.
8. Skandasana
Skandasana stretches the inner thighs, groin and the hamstrings – all of which is necessary to be able to get your hand on the floor (or block) and to be able to hold your top foot in the peak pose.
Take a wide stance and bend your right knee deeply. Your right heel may come away from the floor so if you feel unstable, place a block underneath it. Straighten the left leg but keep a slight bend in the left knee. Slowly rotate your left leg externally from the hip joint, rolling onto your left heel. Actively press your left heel into the floor, this will activate your hamstrings and thigh muscles and keep the stretch safe. If your balance allows, bring your palms together at your chest and stay for a few breaths before doing the pose on the other side.
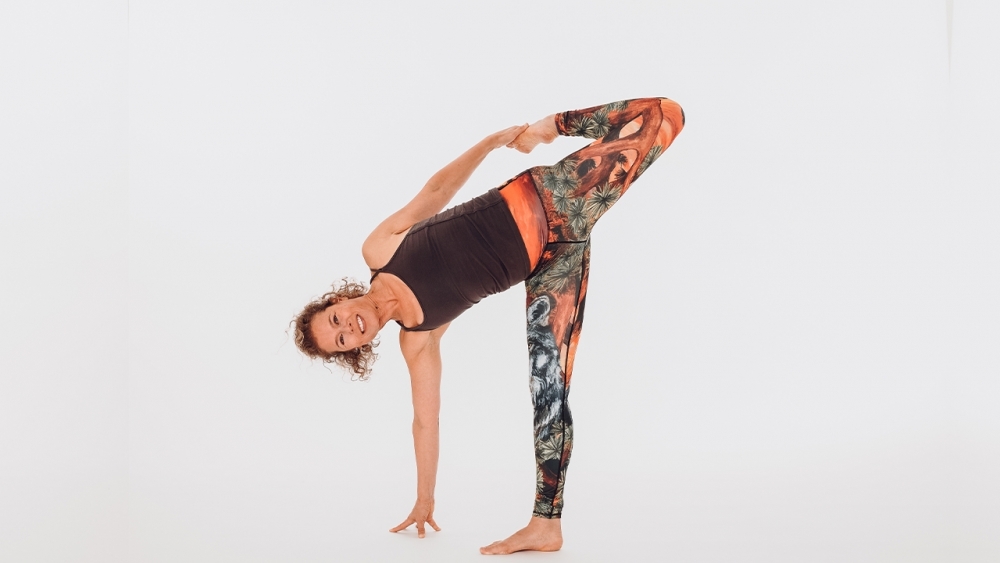
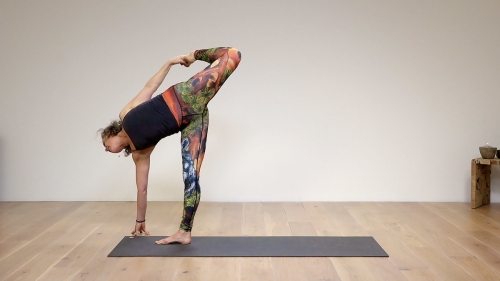
9. Sugarcane pose
This is it! Sugarcane pose (Ardha Chandra Chapasana) is a strong and ‘bendy’ pose that invites all your senses to be alive and vibrant! The whole body gathers at your pelvis: you ground from your pelvis and all power from your legs and arms draw into the pelvis and stretch away from your pelvis. This pose encourages you to ground through your bones and find your focus in balancing, it opens your chest and stretches your lungs, heart and belly. Your back muscles are engaged and strengthened to create a beautiful arch. Your head is carried by your strong neck muscles and the fascial lines in your arms are stretched open.
From Trikonasan with the left in front, step your back/right foot in a little. Place your left fingertips on the floor or a sturdy block, about a foot away from the little toe side of the front foot. Slowly transfer your weight into your left foot; press into your outer heel and press the mound of the big toe strongly into your mat. Take a breath as you ground your standing foot and leg. Keep a micro-bend in your left knee.
Gradually lift your right leg off the floor. Flex your right foot as it leaves your mat to keep the leg muscles engaged. First, stretch your right leg back, right hand to your hip, to find your balance. Keep your gaze down for stability. Take a breath here. Then slowly bring your right knee to your chest and slide your right hand down your shin to your ankle or foot. Pause and take a breath. Then slowly take your knee back to bring it more in line with your hip. Draw your belly in and up as you feel the stretch in your right thigh. Stop when you feel your boundary. Keeping your belly engaged, turn your chest upward. Take another breath! Lastly, if you feel stable and strong, slowly take your gaze sideways and upwards. Then from your belly stretch out and radiate through your entire body! Repeat on the other side.