Small and unassuming but mightily complex and important – our wrists get a lot of action in yoga.
First, a little anatomy
The wrist itself is made up of 8 small carpal bones which collectively make up the carpus. These are firmly bound and provide stability and a little bit of movement. The underside (the palm side) of the carpus is slightly concave creating a channel through which tendons, nerves and ligaments pass from the forearm through to the hand – this is the Carpal Tunnel.
The carpus bones link to the ends of the forearm bones: the radius and the ulna, and the five metacarpal bones of the hand. Because of the complex range of movements the wrist and hand can perform, the joint has a crosshatching web of ligaments connecting all these bones so that there can be mobility without losing stability.
Joints stay healthy by the action of articulation – being kept mobile. This movement keeps the gel-like substance in the joint fluid. If we stop moving the joints, that gel stuff will start to harden and become more bone-like, limiting their range of motion.
During most of our day our wrists are only in a slight angle of extension or flexion – perhaps pushing a door open is the most extreme angle we’ll get into. Then yoga comes along and we ask our wrists to bend at 90 degrees and support some, or all, of our body weight. This is good! It stops us losing that range of motion but it’s also where we are vulnerable to injury.
So what can we do to make sure our wrists have a long and happy yoga practice too?
4 tips for happy wrists
1. Warm Up
Before you launch straight into Sun Salutations take some time to warm up your wrists.
- Create space
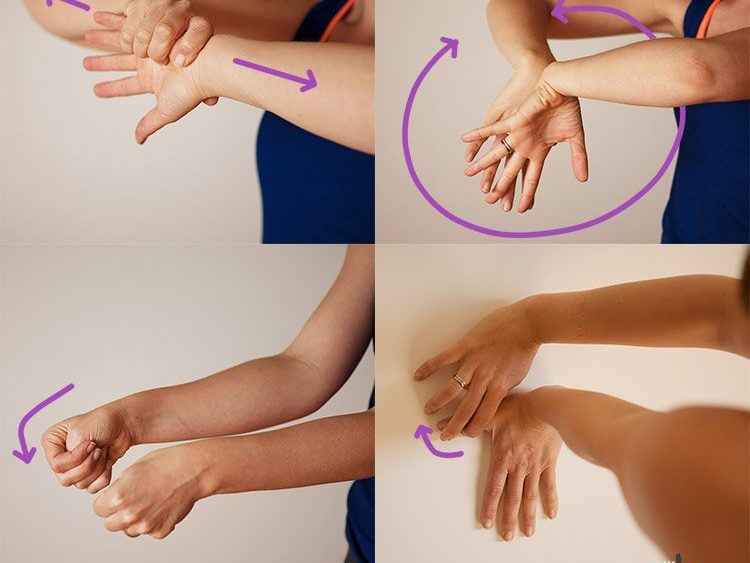
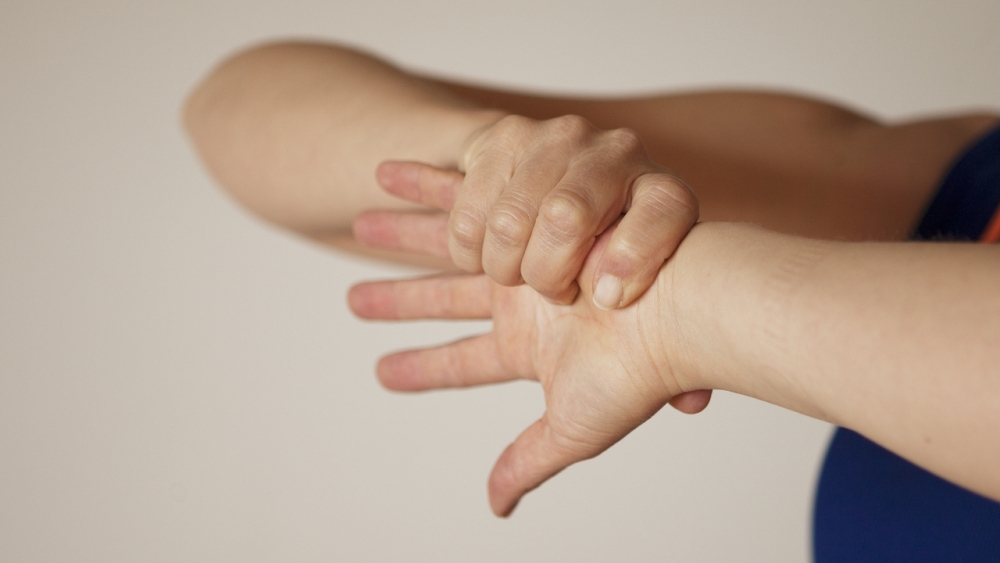
Start with your hands in Anjali Mudra (prayer position), with your thumbs against your breast bone. Release your hands keeping the arms where they are and turn the palm of your left hand away from you. ake hold of the hand with your right hand so that your fingers are over the little finger side of the hand. Keeping hold of the hand gently pull the elbows away from each other (see top left in the image below). This creates space in the joint. You can also gently twist the palm up. Keep connected and if it hurts or feels ‘wrong’ in any way, lighten your pressure or stop. Stay for a few breaths then switch sides. - Wrist stretch
Come onto all fours with your hands under your shoulders and your knees under your hips. Point your fingers towards your knees but with your left palm facing up and your right palm facing down. You can bring your hips back a little towards the heels if you feel you want to increase the stretch. - Rotation of the wrists:
Bring your arms out in front of you and press the backs of your hands together. Keeping your wrists touching, rotate your fingers down and towards you, then up and away (see top right image). Repeat this five times then reverse the direction.
EkhartYoga members: Practise this further with Sandra Carson in her Wrist Flow class.

2. Alignment
Next make sure your alignment in weight-bearing poses is working for you.
Start again in Anjali Mudra (prayer position). First press the heels of the hand together more so that the fingers are only lightly touching each other. If you look at the underside of your wrists you will probably see that there is no gap between the base of your hands and that maybe your wrists are bulging a little.
Now bring your fingers back upright and this time press firmly through the base of the fingers and the fingertips (as well as the heel of the hand). This creates a kind of suction cup in the palm (hasta bandha). If you turn your fingers away again now you will see (or feel) that the pressure is taken off the base of the hands and wrists. You’ll also feel that the muscles in your arms, especially the forearms are activated.
Try this with your hands on the floor: you can be sitting on your heels or on your knees, place your hands under your shoulders, or slightly in front of them, shoulder width apart. Ground through the base of the index finger and thumb. This automatically rolls the forearm in a little – so you then need to rotate the upper arm out to balance it. Claw the fingertips into the floor – this will take the energy up through the arm into the shoulder. This is going to protect your wrists and give you strength when you come into poses like Downward Dog and Plank.
Watch Esther’s video on Protecting your wrists in yoga
3. Build Strength
With correct alignment, provided you don’t have any wrist injuries, you can work on your wrist and hand strength. Plank, Chaturanga Dandasana and Downward Facing Dog will all help you build up wrist and forearm strength, so regular Vinyasa and Ashtanga classes are great for this.
Be patient and stay aware of the sensations in your body especially when you are first starting out and when you are trying new, more challenging arm balances. You can bring the knees down in any of these poses and also skip vinyasas in classes.
EkhartYoga members: Try one of our Ashtanga or Vinyasa online yoga programs for beginners through to advanced.
4. Modifications and Therapy
So what happens to your practice if you have injured your wrists? If you have wrist problems like Carpal Tunnel Syndrome or repetitive strain injuries, of course, speak to your doctor or physical therapist for specific advice. Practising these two stretches during through your day can also help to prevent conditions like these:
- Thumb side stretch:
Hold your arms out in front of you with your palms facing each other. Tuck in your thumbs and wrap your fingers around them. Then keeping your forearms still, tilt your fists down stretching the sides of the thumb and wrist (see bottom left image). Hold for here for 10-20 seconds. - At the wall:
Stand facing a wall and place your right palm flat against it with your fingers pointing down – with your left hand very gently pull your right thumb up a little (see bottom right image). Hold here for 10-20 seconds and you can spend more time on the more painful wrist.
See more: Yoga Exercise for Carpal Tunnel Syndrome
Dealing with wrist injuries
Any kind of injury in yoga can bring up feelings of frustration and impatience but maybe more so with wrists, especially if you practise yoga styles like Vinyasa and Ashtanga. While nobody wants an injury it can be a chance to learn more about your body as well as the finer points of the poses so that you can make modifications to practise them more safely.
There are obviously some poses like arm balances you should be skipping for a while but you can also make modifications so you don’t have to lose your dynamic yoga practice completely when you’re injured or rehabilitating. For example, switching plank pose for high lunges, or come onto your forearms in plank and downward facing dog (into Dolphin pose). This will also work on different areas of your core so you’ll get an extra strong workout.
As your wrists recover work gently to increase mobility. In plank pose try having your hands slightly further forward than your shoulders to decrease the angle in your wrists.
Practise downward facing dog pose at the wall: stand about a leg’s distance away from the wall and place your hands flat on it, remembering the alignment principles mentioned above. Keeping your arms straight and in line with your spine start to walk them down the wall until you come into an upside down L-shape.
EkhartYoga members:
- For more inspiration about modification and using props to support your wrists practice Francesca Giusti’s Yoga Flow for Sensitive Wrists
- Or for a stronger flow try Sandra Carson’s Light of the Heart practice
With no Chaturangas or Downward Dogs this is great for shoulder or elbow injuries too. In this practice the hands are in reverse prayer position but you can hold your opposite elbows instead if this is more comfortable. - You can also take a look at our wrist-friendly yoga classes

