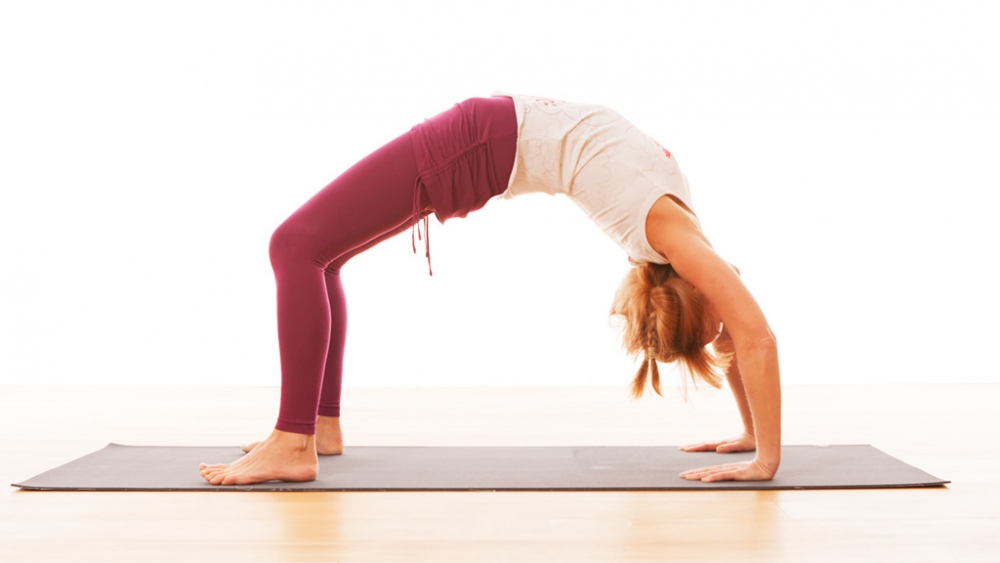
Urdhva Dhanurasana (Wheel pose) is one of those poses that you may have daintily sprung up into as a child (maybe you called it Crab back then) but attempted it years later in a yoga class, only to find your arms wobbling, knees splaying and back aching!
In an ideal world you will have the guidance of a great teacher to complement your home practice who can help you work on challenging poses like Wheel. But many of you are in wonderfully far-flung places, or perhaps studio classes are inaccessible for other reasons, like time or money. So this article is about how to do some detective work yourself and analyse your own version of Wheel (whatever stage you are at with it).
Why is Wheel pose so challenging?
We hear often about how we live too much in the front side of the body (the Sagittal Plane) because of our sitting habits and so many other daily actions. In Planes of Movement in Yoga, Jennilee describes how “Due to large amounts of time spent in forward flexion, hip flexors and chest muscles become extremely tight, locked short”. When you think of the shape of Wheel pose it is pretty much the exact opposite to how most of us spend our waking days, so it’s no wonder many people find it a physical challenge but it’s also emotionally charged. Backbends are generally hard work on the body but also put us in a vulnerable position, literally. The flip side of this is that when you get into your Wheel pose (or the right backbend for you) it can feel liberating, releasing and, maybe even “heart-opening”. The hard work we put in and feeling that extra strength in our muscles makes us feel more confident and mentally stronger.
Breaking down Wheel
By breaking the pose down into components you may find that while you’re flexible enough in your shoulders, the fronts of your hips feel restricted. Even if you already get up into full Wheel this is a way to see if you are letting some of your more flexible areas compensate for other ‘stiffer’ parts of your body. By doing this analysis you can then work on each part individually with different poses, so you can take a break from Wheel itself if you need to.
Warm up first
Please make sure you’re fully warmed up before trying out any individual poses. Work with patience and stability and stay focused on the practice rather than the final shape of any particular pose. As Sandra Carson says in her brilliant article The Flexibility Myth,“We can get so fixated on getting somewhere, becoming something, that we bypass ourselves and unconsciously put our health at risk”.
So, keeping that in mind, let us look at what’s involved in Wheel and ask, as Esther does in her teacher trainings, “what needs to be open, what needs to be strong?”
1. Wrists and upper body strength
There are two challenges for the wrists in wheel pose: the load placed on them and the angle they need to be in.
If you are practising classes with Wheel pose in you should already be very familiar with poses like Downward Facing Dog and Plank and so will have started building strength in your wrists and upper body. Another strengthening pose to help with Wheel is Upward Facing Plank, holding this for 5 deep breaths. This pose will also help to open the chest. You can keep the knees bent and turn it into a Reverse Tabletop pose to begin with, this will help you work on the foot and knee positioning for Wheel. If you feel like you have too much weight on your wrists check that you are pushing firmly into the floor with your hands to create a rebound effect.
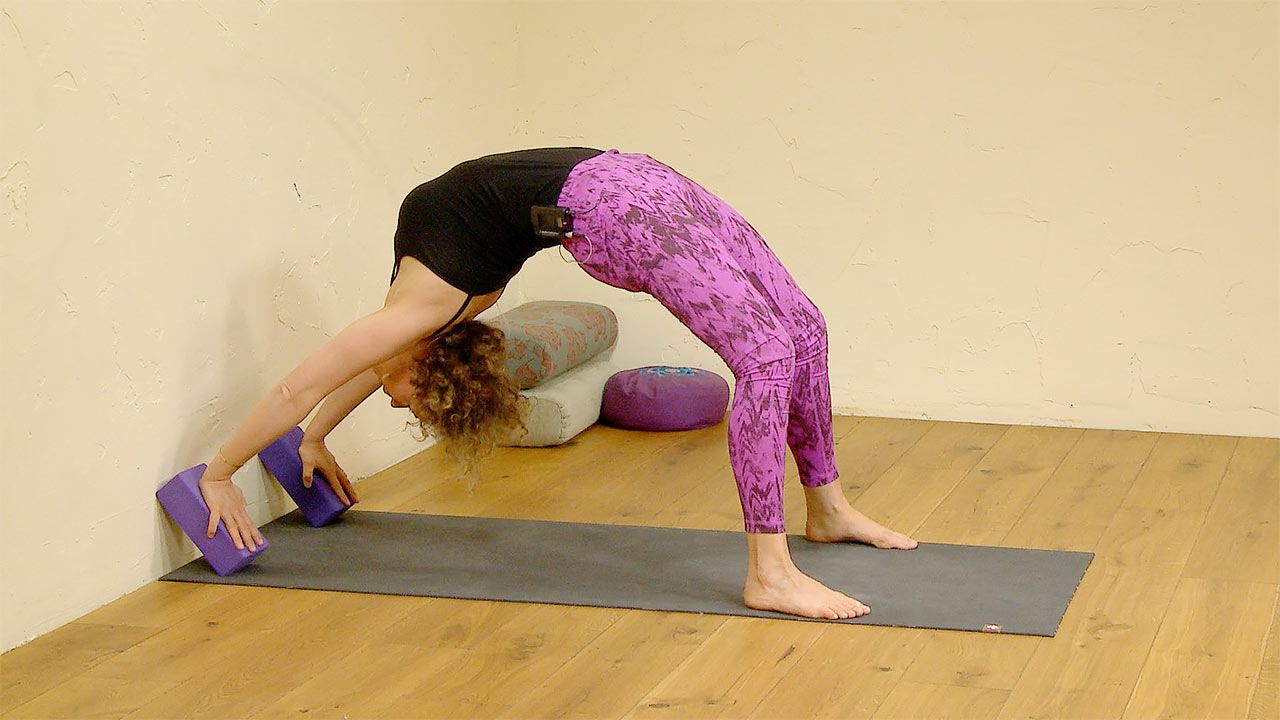
The second challenge is the angle of the wrists. In Wheel, the forearm is going to make a right-angle with the back of the hand. Make that same angle while standing in front of a wall; bringing your forearms parallel with the floor and pressing your hands on the wall. If this already feels very uncomfortable on your wrists then it could be you have some restriction there. If this is the case but you still want to practice Wheel, use two blocks set up at an angle against a wall (as in the picture of Sandra below).
The blocks should be shoulder-distance apart and on your non-slip mat rather than a bare floor. Watch Sandra’s Urdhva Dhanurasana tutorial for more instructions on how to set them up.
- You’ll find more advice on looking after your wrists, plus classes for when they need a break, in Kirsty’s article 5 tips to avoid wrist pain in yoga
2. Shoulders and back
Test your shoulder and upper back mobility with Puppy Dog pose. Start on all fours (hands under your shoulders and knees under your hips) and extend your arms out in front of you, making a straight line from your hips to your fingers. You can either stay here or gently bring the chest and chin further down toward the floor as you exhale. This stage of the pose can feel uncomfortable on the neck. If so, bring your forehead down instead of the chin so the back of the neck remains long. Or you can do this same pose at the wall: stand an arm’s length away from the wall and then walk your hands up the wall as you bring your chest closer to it.

- Practise Puppy Dog pose in class with Marlene Henny: Tension tamer for the shoulders and upper back
Use Cobra pose to help work out whether you are getting an even bend in your back. Start off with a very low Cobra and take your time to notice sensations in your upper back. Sometimes we think higher equals better, so we push straight up into Cobra and let all the backbend happen in the lumbar spine (guilty as charged!). So as you *slowly* come up higher, keep pausing, breathing and checking on the sensations throughout the whole of the back, making any adjustments you need.
Your back, of course, needs to be strong as well as flexible to help you stay active in Wheel pose, rather than resting all your weight on your wrists. To strengthen the back include Locust variations in your practice.
- For a brilliant backbending class which will help with both flexibility and strength, I highly recommend Esther Ekhart’s Sukha flow – enjoy good space
3. Hips and thighs
If you are quite flexible in your back you may not always notice tightness in the front of the hips and thighs (hip flexors) as you can still get into the basic shape of Wheel pose. However, too much restriction in the hip flexors will keep your pelvis tipping forward and so probably means that you are hinging in the lower back more, instead of getting a nice even arc in your whole back.
See how the front of your hips and thighs feel in a High Lunge pose but keep the back knee slightly bent so that your pelvis is in a more neutral position as if you were standing in Tadasana. This will mimic the same line or action you are looking for in Wheel.
If you feel a lot of restriction there, work on that bent-knee High Lunge and also Saddle pose (Supta Virasana). Try a one-legged variation of Saddle with one foot is flat on the floor with the knee pointing up while the other leg is folded in the pose. This helps to focus the pose on your hip instead of your lower back and it also makes it easier to use plenty of blocks or cushions under your hips if you need them. Read Jose’s de Groot’s article for more Saddle Pose variations.
- Practise the bent-knee high lunge variation in Sandra Carson’s awesome Front line opening class. In this class, you’ll learn about the lines or layers of connected tissue in the body and how ‘tightness’ in the hips will affect the whole front line of your body including your belly, neck and even your shins. This class will help with all backbends regardless of where your restriction is.
4. Mindset
Finally, as I talked about at the beginning, Wheel pose can be emotionally confronting. Apprehension, frustration, excitement are all feelings that can come up. Try some mental rehearsal before you practice Wheel pose. Take some time to visualise yourself coming into the pose, staying for five comfortable breaths, and coming out of the pose with control. Notice what thoughts or feelings comes up as you picture yourself doing the pose.
- For more on this read Olav’s advice on Tackling a Difficult Pose.
I hope that this helps give you a better understanding of how to assess your own pose so you can improve and practice safely on your own if you don’t have a teacher nearby.


